Reader's Challenge: What's for Dinner?

/ Wednesday, November 30, 2011 /
Dawn and I have had a lot of fun with Cats. Crooners. Cook. over the past few months. We’ve enjoyed sharing our joy of cooking with all of you. Our blog is still young, but we’re growing. In fact we’ve just passed 1000 pageviews. In celebration of that, Dawn and I want your help. Each of us has chosen three potential dishes and we want you to choose what we’re going to make. We’ll each make the dish from our list that receives the most support from you, our readers. We’re planning to make these dishes this weekend.

Please send us your comments telling us what you want to see for dinner! Thanks everyone for participating.

The three dishes I’ve chosen are as follows:

Star Anise and Pomegranate Flank Steak: Flank steak marinated for 24 hours in a pomegranate soy base then grilled and garnished with fresh pomegranate seeds.

Ossobuco: An Italian classic. Fresh veal, cooked with fresh vegetables.

Rack of Lamb with Mint Pesto and Warm Gorgonzola Potato Salad: I think the title says it all.


The three dishes Dawn has chosen are:

Wild Greens-Filled Ravioli with Walnut Sauce: Homemade pasta, stuffed with wild greens, then bathed in a creamy garlic and walnut sauce.

Boston Cream Pie Cake: A tribute to the classic Boston Cream Pie, with 4 layers of milk sponge cake, vanilla and chocolate pastry cream, and a chocolate glaze.

Asparagus Lasagna: A sundried tomato pesto layered between fresh homemade pasta, vegetables, and cheese.

Berry Crisp

/ Tuesday, November 29, 2011 /

After a very filling lunch today of winter vegetable chili, Aric and I were in the mood for something simple but satisfying. Pair that with this being the first snow day of the season in Dayton, OH, I figured something warm would fit the bill. So I turned to a favorite that works well as a breakfast dish, a dessert, or in this case, a tasty dinner in front of the fire. I am referring to a gooey bowl of berry crisp. Once again, it is a Williams-Sonoma recipe (honestly, I am not getting paid by them to promote their stuff, I just really adore their company) and it is pretty straight forward to make.

A couple notes: the recipe calls for pecans but feel free to pick and choose nuts of your choosing. Tonight I had walnuts and cashews on hand so I used those. I also saw a bag of shredded coconut and threw some of that in too. It is pretty flexible to what you are in the mood for. Second note is the butter. I didn't have time to do this tonight but Aric's mom actually told me about this trick. If you get a stick of butter really cold, you can get those pea size pieces that they always talk about in recipes without a whole lot of effort that we are all used to - simply grate it on a grater and voila! Pea size pieces. Brilliant.


Without further ado, here is the recipe.

Ingredients:

  • 1/2 cup rolled oats
  • 1/3 cup firmly packed light brown sugar
  • 1/2 cup chopped toasted pecans
  • 1/2 cup all-purpose flour
  • 1/2 tsp. salt
  • 4 Tbs. (1/2 stick) cold unsalted butter, cut into
      1-inch pieces
  • 3/4 cup plain yogurt
  • 1/4 cup honey, plus more for drizzling
  • 4 cups mixed berries
  • 1/4 cup granulated sugar
  • 1 1/2 Tbs. cornstarch
  • 1 1/2 tsp. water

Directions:

Preheat an oven to 375ºF.

In a bowl, stir together the oats, brown sugar, pecans, flour and salt. Using your fingers or 2 knives, cut in the butter until no clumps remain. Set the topping aside.

In a small bowl, whisk together the yogurt and the 1/4 cup honey. Cover and refrigerate until ready to serve.

In a saucepan over medium-low heat, combine the berries, granulated sugar, cornstarch and water. Cook, stirring occasionally, until the berries release their juices, 5 to 10 minutes. Increase the heat to medium and simmer until thickened, 5 to 10 minutes more.

Transfer the berry mixture to a ceramic loaf pan and sprinkle the topping over the fruit. Set the dish on a baking sheet and bake until the filling is bubbling and the topping is golden brown, about 25 minutes. Let stand for 10 minutes.

Spoon the crisp into 2 bowls, dividing evenly. Drizzle with the yogurt mixture and more honey.
 
Serves 2.

Eggnog Waffles

/ Monday, November 28, 2011 /

Well we’ve covered the African appetizer, so let’s get to the main course, eggnog waffles. There is absolutely no connection between my choices for tonight’s meal, simply liked how these recipes looked. The recipe for eggnog waffles comes from my favorite cook book, yup, Bobby Flay’s Throwdown! For those of you who don’t know anything about Bobby Flay, he has a TV show called Throwdown where he challenges people from around the country to a cooking throwdown, challenging them to a cook-off of their signature dish. The cookbook I keep returning to is a compilation of some of Bobby’s favorite episodes which includes the recipes of both Bobby and the chef he has challenged. The reason for this short explanation is that to date, I have only used Bobby’s recipes. Tonight marked the first time I’ve ventured to the other side of the aisle and utilized the local chef’s recipe. The episode I‘ve chosen from was titled Chicken and Waffles. The recipe comes from Melba Wilson. She explained that she developed eggnog waffles accidentally. One day while making a batch of regular waffles, she realized she was out of heavy cream and used what she had available as a substitute, eggnog. She loved the result so much, she never went back to heavy cream. No chicken today, just the waffles, but lets get straight into this fun twist on a classic recipe.

Ingredients

2 cups all-purpose flour
2 tsp. baking powder
Pinch of ground cinnamon
Pinch of ground nutmeg
2 cups eggnog
2 large eggs, separated
4 Tbsp. unslated butter, melted
Cooking spray, for waffle iron


For the Strawberry Butter

1 cup unsalted butter, slightly softened
4 oz. strawberries, hulled and sliced
A few drops of grenadine syrup

Directions for the Waffles

Combine the flour, baking powder, cinnamon, and nutmeg in a medium bowl. Whisk the eggnog, egg yolks, and butter in another bowl. Stir the wet ingredients into the dry until combined. Wish the egg whites until almost stiff; fold them into the batter. Heat the waffle Iron. Spray the iron with cooking spray. Pour some of the batter into the middle of the iron, following the manufacturer’s instructions. Close and cook until golden brown and cooked through, 3 to 4 minutes. Repeat with the remaining batter. Top the waffles with the Strawberry Butter, and Maple Syrup.


Directions for the Strawberry Butter

Put the butter in a food processor fitted with the metal blade, and blend until smooth. Add the berries and grenadine and pulse until combined, but with small pieces of berry still visible.
-

Kalawule (Spicy Fried Bananas)

/ /
It’s been a fantastic food night in the Merrill house this evening. I’m sitting here on my couch with a belly full of eggnog waffles and kalawule, while every breath I draw pulls me deeper into the aroma of Dawn’s winter vegetable chili (tomorrow’s lunch). It’s been a fun night. Let’s start with the Kalawule, which filled the role of appetizer this evening.


I had a very short business trip to Baltimore this past summer, there and back the same day, but I was able to schedule enough time for a short stroll around Fell’s Point, and an early dinner, before I had to run back to the airport. Quick side story, but for those of you who don’t know, Baltimore, MD is awesome. It’s a fantastic harbor city, and it has some fantastic food. If you ever find yourself in Baltimore with a couple spare hours, I highly encourage you to try the following restaurants: Pazo Restaurant, a swanky tapas bar located in a renovated old brick warehouse; and The Black Olive, a Greek inspired seafood restaurant (they have a seafood bar, where you get to choose the specific fish you eat). I promise I’m going somewhere with this. As I said, I had a few minutes to walk around Fell’s Point, and ducked into a few of the local stores, one of which had a cookbook that I just couldn’t leave behind, The World of Street Food. Kalawule is my first attempt at any of its tantalizing recipes. For those who are not familiar with kalawule, it originates from Africa. It’s a very simple dish, often sold by street vendors from trays in the evenings. Here are the ingredients.

4 Firm bananas, cut into chunks
½ - 1 tsp grated fresh or powdered ginger
½ tsp cayenne or chili powder (I did a little of both)
½ tsp ground black pepper
Palm or peanut oil (I didn’t have either, but used some Spanish olive oil)
Salt


Directions:

1. In a bowl, mix the ginger with the cayenne and chili, pepper, salt and a few drops of water to combine the ingredients.
2. Put the chunks of banana into the spices and coat them well.
3. Heat the oil in a deep-fryer or wok and cook the banana pieces in hot oil until nicely golden. Drain well on a paper towel.

It’s simple, quick, fun, and really tastes great! Dawn and I are planning to make Zitumbuwa soon, which is very similar, but instead of the spices the bananas are coated with sugar to make a sweet treat.

Mustard & Molasses Baked Beans

/ Sunday, November 27, 2011 /
As Aric mentioned, he had come up with a Cuban themed dinner and my contribution was a side dish. While I was searching for a recipe, I came across this sweet and tangy baked bean dish from Williams-Sonoma. It actually hails from the Carolinas so it doesn't really adhere to the Cuban theme but the savory flavors of mustard and molasses were bound to be a perfect compliment to Aric's chicken.

I was not mistaken. This was a delicious new twist on baked beans... and easy! It tastes like you have spent hours slow baking the beans and all it takes is half an hour from start to finish!

Enjoy.


Ingredients:
10 oz. bacon, cut into 1/2-inch pieces (I used veggie bacon strips)
1 large yellow onion, diced
5 tsp. salt
1/4 tsp. cayenne pepper
3/4 cup mustard and molasses grilling sauce
3/4 cup water, plus more as needed
2 cans (each 15 oz.) kidney beans, drained and rinsed
2 cans (each 15 oz.) pinto beans, drained and rinsed

Directions:
In a large saucepan over medium-high heat, cook the bacon, stirring occasionally, until golden but not crisp, about 5 minutes. Add the onion and cook, stirring occasionally, until soft and translucent, 7 to 10 minutes.

Stir in the salt, cayenne, grilling sauce, the 3/4 cup water, and the kidney and pinto beans. Bring to a simmer, then reduce the heat to medium-low, cover and cook for 15 minutes.

Uncover, stir the beans and add more water to achieve the desired consistency. Continue to cook, uncovered for 5 minutes more. Serve warm.

Serves 8.

Havana Nights!

/ Saturday, November 26, 2011 /
I am ashamed to say that it took me almost a complete year to really delve into Bobby Flay’s Throw Down cookbook, which Dawn gave me as a Valentine's Day present last year. It had nothing to do with my interest in the recipes inside. Simply, that just about every time I would go on a recipe hunt I used the internet since I wasn’t at my house. But after the smashing success of Bobby’s Mac & Cheese, I decided to see what other recipes intrigued me. It didn’t take me long. Actually, I now have a Throw Down recipe waiting list. In particular, there are several chicken recipes that I want to take a shot at. The ironic thing here is that not more than a year ago, I hated chicken. The only form of chicken I would eat was nugget form. I don’t really have a reason. Maybe I just had some really bad experiences, but I never seemed to find any chicken that I liked. But then like many things, Dawn perked my interest. I can’t remember if it was due to a chicken dish she made me, or if it was her suggestion that I BBQ some chicken, which led to my first original Aric Merrill recipe, Raspberry Chicken (which I will post about after Christmas), but it worked. Chicken is my new favorite food to cook. Let’s get back on track here.

As I was saying, I identified several dishes that I wanted to prepare, but was most interested by Bobby Flay’s Cuban Pork with Sour Orange Sauce. Now some of you may be confused since I spent the whole first paragraph rattling on about chicken, and those of you who know me may be confused because you know I don’t eat pork. Well the marinade and the mojo dipping sauce for this Cuban pork sounded so amazing so decided I had to try it and thought it would go great with Chicken; I was not disappointed. The Cuban pork got me all riled up and I decided that we needed to do a cultural theme so I found a great recipe for a Cuban salad to pair with the chicken. Let’s delve into the salad straight away.

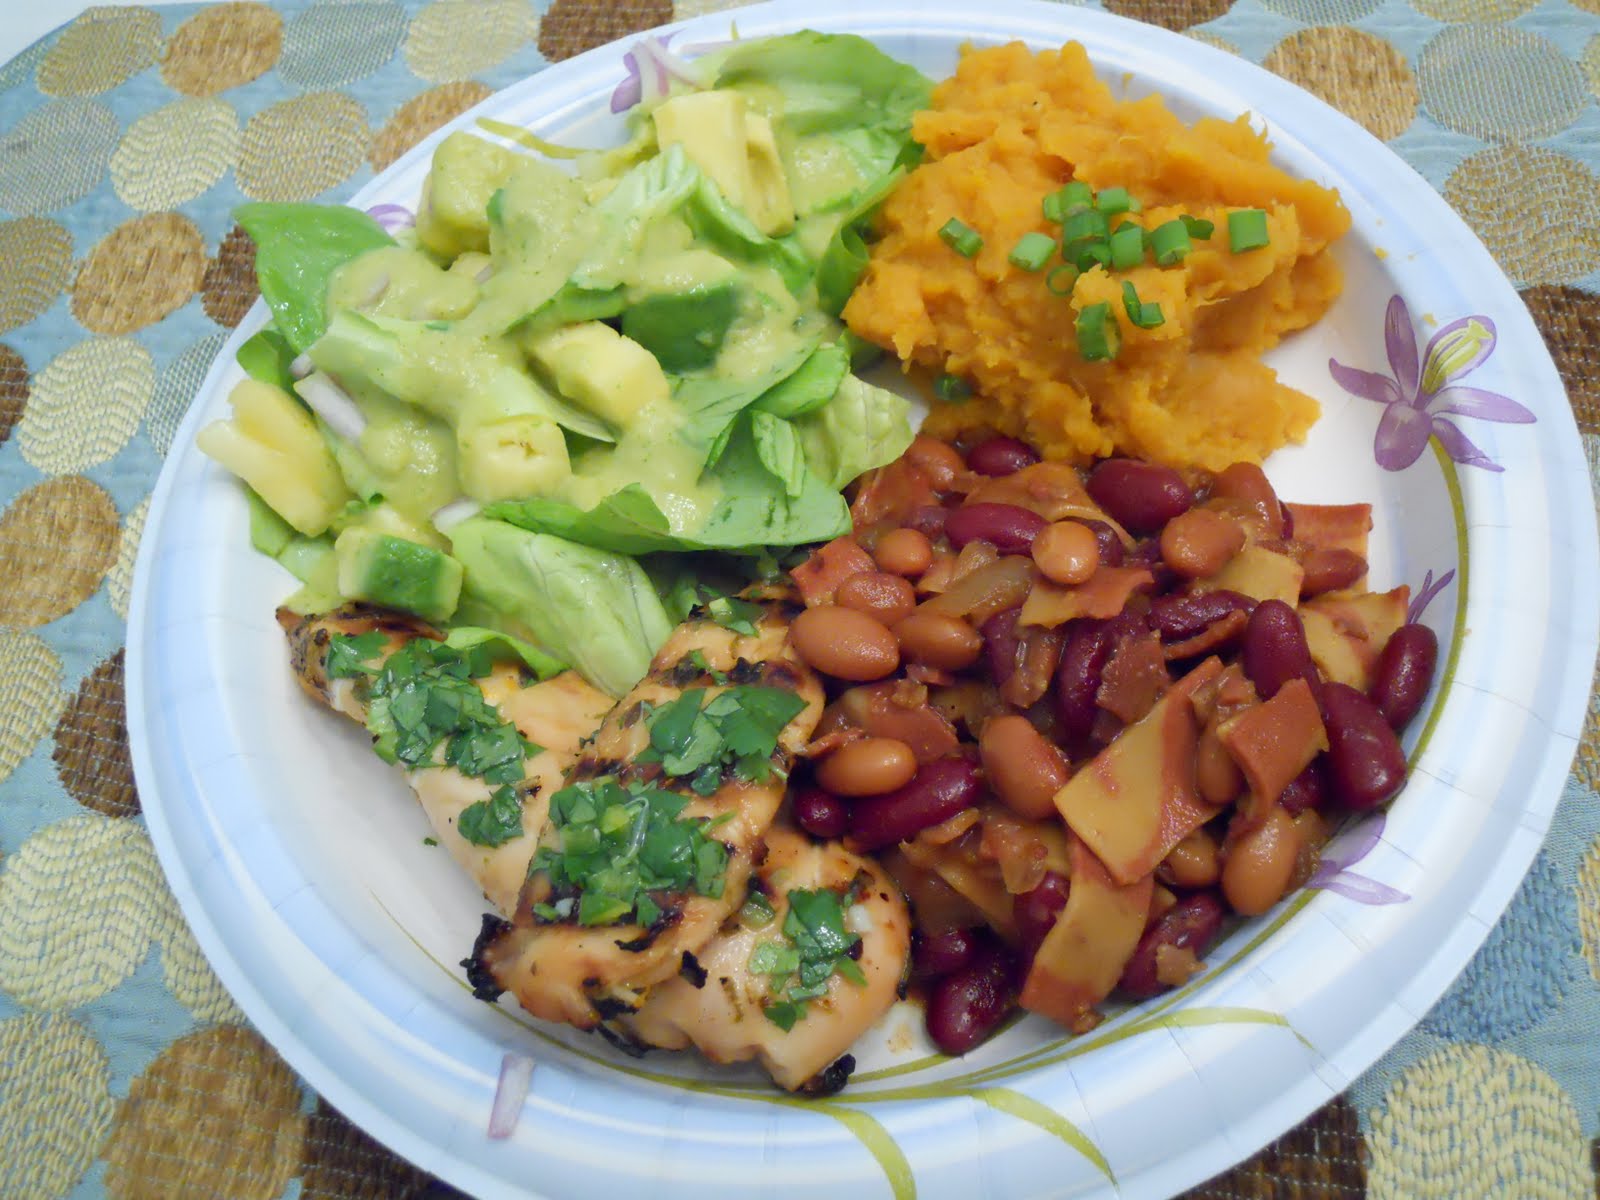
Avocado & Pineapple Salad

The salad itself its incredibly simple. Just combine the following items:

Shredded iceberg lettuce
2 Cups Pineapple Chunks
1 Large Avocado, peeled and cut into cubes
1 Small onion, sliced thin


This recipe did come with its own simple vinaigrette dressing, but I found the following recipe for a Cuban Mango Mojo that sounded to die for, and I figured it would make a wicked good salad dressing.

Cuban Mango Mojo

2 Cups fresh mango
½ Cup fresh lime juice
½ cup fresh orange juice
1 red onion, diced
¼ Cup garlic, chopped
¼ Cup ginger, chopped
1Tbsp. sugar
1 Bunch Cilantro, minced
2 Cups Olive Oil
Salt & Pepper to taste

A few points of interest. This is the original recipe. It makes a lot of Mojo. I cut up 2 fresh mangos, used the juice from 2-3 fresh limes, used store bought OJ, used about ½ an onion, used about 4 cloves of garlic, and much closer to 1/8 cup of ginger, and no more than 2/3 cup of olive oil. But play it by ear to see what seems to be working for you.

Directions:

Mix the all the ingredients into a blender and puree. Use the olive oil to get to the consistency you desire. Use the salt & Pepper to season to your preferred taste. Once completed, simply pour over the salad and enjoy.


Bobby Flay’s Cuban Pork (or Chicken) with Sour Orange Sauce

Interestingly enough, Bobby’s recipe differs ever so slightly from the recipe I have posted here, which was found on the internet, to the one he has in his cook book.


Ingredients:

4 1/2 cups fresh orange juice, divided
1 1/4 cups fresh lime juice, divided
1 orange, zested
1 lime, zested
1/2 cup finely chopped fresh oregano, divided
12 cloves garlic, coarsely chopped
1/2 cup olive oil
1 bone-in pork shoulder (about 4 to 6-pounds), trimmed of excess fat (I used a couple of chicken breasts)
Salt and freshly ground black pepper
Mojo Dipping Sauce, recipe follows

Directions:

Combine 4 cups of the orange juice and 1 cup of the lime juice and zest in a large saucepan over high heat and reduce to 2 cups. Remove from the heat and stir in the remaining orange juice and lime juice add a few cloves of garlic and 1/4 cup of the oregano. Let cool to room temperature.

Using a paring knife, make small slits over the entire surface of the pork and rub the garlic into the slashes. Whisk together the oil and remaining 1/4 cup of the oregano in a large roasting pan, add the pork and turn to coat, cover and let marinate in the refrigerator for at least 4 hours and up to 24 hours.

Preheat the oven to 425 degrees F. I also grilled my chicken on the BBQ. The BBQ season is rapidly coming to an end, so I’m using every excuse in the book to get outside and grill.

Remove the pork from the refrigerator 30 minutes before roasting. Season the pork with salt and pepper and cook for 30 minutes. Reduce the heat to 375 degrees F and continue roasting, basting with the marinade during the last 30 minutes of roasting until golden brown and an instant-read thermometer inserted into the center reaches 150 degrees F. Remove from the oven, baste with any remaining glaze, tent loosely and let rest 15 minutes before slicing.

Mojo Dipping Sauce:

8 cloves garlic
1 serrano chile, chopped
3 tablespoons chopped cilantro leaves
Salt
1/2 cup orange juice
1/4 cup lime juice
1/4 cup extra-virgin olive oil

Using a mortar and pestle, mash the garlic, serrano, cilantro and a few pinches of salt until it becomes a paste. Add the orange juice, lime juice and oil and stir to combine.


Dawn will be following up with a post explaining the beans you've seen in the photos throughout this post.

Mozzarella Salad with Sun-Dried Tomatoes

/ /
This is actually a follow-up to the Bobby Flay’s Macaroni and Cheese night Dawn and I had a week or so ago. We did have a couple semi healthy items that day. This salad is from a cook book I picked up a few years ago titled, Simple but Perfect Salads. I’ve made several of their salads, all of which have been nothing short of wonderful, but both Dawn and I felt this may have been one of the best salads in the book. It’s a very simple salad, which is actually one of the reasons I chose it. The Mac & Cheese was quite involved, so we wanted our salad to be something quite simple. Let’s not waste any time, let’s get right into the recipe.


Ingredients:
A bag of mixed salad greens, such as oak leaf lettuce, baby spinach, and arugula.
A ball of smoked mozzarella cheese, cubed.

For the Dressing:
5 oz. sun-dried tomatoes in olive oil, reserve the oil from the jar
¼ cup coarsely shredded fresh basil
¼ cup coarsely chopped fresh flat-leaf parsley
1 Tbsp. capers, rinsed
1 Tbsp. balsamic vinegar
1 garlic clove, coarsely chopped
Extra olive oil, if necessary
Freshly ground pepper

Put the sun-dried tomatoes, basil, parsley, capers, vinegar, and garlic in a food processor or blender. Measure the oil from the sun-dried tomatoes jar and make it up to 2/3 cup with more olive oil if necessary. Add it to the food processor or blender and process until smooth. Season to taste with pepper.


Divide the salad greens among 4 individual serving plates. Top with the cubes of mozzarella and spoon the dressing over them. Serve immediately.

Mini Pumpkin Pies

/ Friday, November 25, 2011 /
I recently fell in love with mini pies on Pinterest. When I decided to tackle a vegan friendly pumpkin pie for Thanksgiving, I thought I would incorporate the mini pies too. Taking on two new endeavors the day before Thanksgiving - risky? Possibly. But my philosophy is “Go big or go home.” (This doesn’t mean that I still didn’t turn to Aric as soon as popped the pies into the oven and say “Start praying!”)


All kidding aside, these pies exceeded all of my wildest hopes and expectations. The filling was just like traditional pumpkin pie filling and the crust was on the firmer side, like a tart shell, which was perfect for handling the mini-pies.

Again, like the rest of our Thanksgiving contributions, these are dairy-free, soy-free, nut-free, wheat-free, and egg-free and I owe much credit to Vegan Spoonful and The Blender for the recipes.

Pie Crust (courtesy of The Blender

The gluten in wheat flour does a beautiful job binding dough. However, when working without it, pay particular attention to some steps in order to ensure success. Following is a gluten-free pie crust recipe using readily available ingredients. For instructions and tips on making this gluten-free dough and crust, visit Simply Gluten-Free. Note that some individuals are sensitive to xanthan gum, a binder commonly found in gluten-free flour mixes. In this recipe, flax (or chia) meal is used in place of xanthan gum.

This recipe makes one 9 inch pie crust. If you are making the mini pies, you will require two 9 inch crusts.


Ingredients:
1/2 cup Shortening
4 to 8 Tbs. cold water
1 1/4 cups Gluten-Free Multi-Purpose Flour, plus more for rolling
1/4 tsp. salt
2 Tbs. sugar
3 Tbs. ground flax seed or ground chia seed

Directions
Cut butter into ½ inch pieces and place it the freezer for 15 – 30 minutes.
Add some ice cubes to the water and let it get ice cold while preparing the dry ingredients. Combine the flour blend, salt and sugar in a bowl. Stir 5 -6 times to combine. Add the shortening and stir until the mixture resembles coarse meal with some pea size pieces of shortening.

Add ice water 1 tablespoon at a time until the mixture just barely starts to clump together. If you pinch some of the crumbly dough together and it holds then you have enough water, if not add more a little at a time. You do not want to add any more water than is absolutely necessary.
Remove the dough from the machine and pour the mixture into a large food storage bag and form it into a disk using the bag to help (the dough doesn’t form like regular dough so using the bag makes it easier to combine). Close up the bag and put it in the fridge for at least an hour. Remove dough from fridge 5 minutes before rolling.

To roll the dough, lay a piece of waxed paper on a work surface and sprinkle with some flour blend. Lay the chilled disk on the floured paper, sprinkle with some more flour and lay on another piece of waxed paper. Roll the dough into a circle approximately 12 inches wide. Remove the top sheet of waxed paper and carefully cut out 4 inch rounds with a glass or cutter and remove the waxed paper. Push the dough very gently down so it lines the bottom and sides of the muffin tins. If the dough splits or breaks apart just push it back together.


Pie Filling (courtesy of Vegan Spoonful)

Ingredients:
2 cups pureed pumpkin (or one 15-oz can)
1 cup plain nondairy milk (soy, almond, coconut)*
3/4 cup sugar
2 1/2 – 3 Tbsp cornstarch
1 tsp cinnamon
1/2 tsp ground ginger
1/2 tsp salt
1/4 tsp ground cloves
1/4 tsp ground nutmeg

Preparation:
Preheat oven to 350 degrees. Combine pumpkin, non-dairy milk, sugar, cornstarch, salt, and spices in a large bowl, and mix very well with an electric mixer. Pour into unbaked pastry shell, and bake for about 60 minutes. The pie will still be jiggly when you take it out of the oven, but it will firm up as it cools. Cool completely on a cooling rack, cover with plastic wrap, and refrigerate for several hours or overnight before serving. Serve chilled.

I used Thai Kitchen’s Full Fat Coconut milk for this recipe, given the no soy restriction, and it worked amazingly well. You couldn’t taste the coconut but it definitely added a richness and creaminess to the filling.  Almond and soy milk will also both produce great results. The only milk that doesn’t seem to be recommend is rice milk – the consistency is a bit too thin to produce a nice creamy pie.

Makes 14 mini pies.

A Healthy Thanksgiving Part Doux

/ /
As Dawn mentioned earlier, our goal for Thanksgiving was to make some food that some of the new mothers who are dealing with food allergy issues would be able to eat as well. My responsibility was to make the Sweet Potato Mash, or for those of you who need someone to explain the obvious, mashed sweet potatoes. Not generally the most difficult dish to make, but Dawn kept my ego in tack by convincing me that it was the key to a successful Thanksgiving. It took her a while, but she was able to convince me telling the truth by using the Pythagorean theory and a bunch of big words.

Dawn found the recipe in her vast Williams-Sonoma files. The only thing we did differently was avoid the pecans since some of the potential consumers have a few allergy concerns regarding nuts. We loved this recipe. Dawn and I both commented on how good this dish was, and how we can work it into another meal. I hope some of you will try is and enjoy it as much as we do. Happy Thanksgiving everyone! (And I apologize for the following picture, it looks more like sweet potato ice cream than it looks like the Mash)


Ingredients:
3 ½ Lbs. Sweet Potatoes, peeled and cut into 2-inch pieces
6 Tbs. (3/4 stick) unsalted butter
1 Tbs. thinly sliced fresh sage
½ tsp. ground cinnamon
1/8 tsp. freshly grated nutmeg
3 Tbs. firmly packed light brown sugar
Kosher salt and freshly ground black pepper, to taste
½ cup maple syrup
½ cup toasted chopped pecans

Directions:
Place the sweet potatoes in a large pot, add water to cover by 3 inches and bring to a boil over medium-high heat. Reduce the heat to medium-low and gently cook the potatoes until they are tender when pierced with a fork, 15 to 20 minutes. Drain well in a colander. 


Fit a food mill with the disk with the smallest holes, set over the pot and pass the sweet potatoes through in batches.

In a small saucepan over medium heat, melt the butter. Add the sage, cinnamon, nutmeg and brown sugar and cook, stirring constantly, for 1 minute. Pour the butter mixture over the sweet potatoes, season with salt and pepper, and stir until incorporated. Transfer the sweet potatoes to a serving bowl and cover loosely with aluminum foil.

In another small saucepan over medium heat, combine the maple syrup and pecans and heat until just warmed through. Transfer to a small serving bowl. Serve the mashed sweet potatoes immediately and pass the maple-pecan drizzle alongside. Serves 6 to 8.

Here's what our Thanksgiving meal looked like!


Happy Healthy Thanksgiving!

/ /
Happy Thanksgiving!

We hope all of you had a great Thanksgiving yesterday, full of family, friends, and of course, amazing food! We certainly lucked out with our Thanksgiving feast. We spent the day with Aric’s family as well as with friends of ours and everyone contributed to the whole meal. We not only ended up having quite the tasty spread but it was by and large very health conscious as well. I know the words health conscious and Thanksgiving generally don’t go together but this meal proved that the two can harmoniously coexist.

Since a lot of the mothers attending Thanksgiving dinner have had to forgo dairy in their diets to appease the allergies and sensitivities of their young babies, there was a limited amount of cheese in the dishes. On top of that, one of the moms has recently had to cut out dairy, wheat, soy, eggs, and nuts from her diet. I couldn’t stand the thought of someone not being able to enjoy a traditional Thanksgiving meal so I went in search of food that everyone could eat and enjoy.

All of the dishes Aric and I are posting on for Thanksgiving are dairy-free, soy-free, nut-free, wheat-free, and egg-free. And each were met with great enthusiasm by the 20 something people that tasted each recipe, and the crowd ranged from vegans to carnivores. So whether you are on a strict diet, are vegan, or just want some healthy ideas that taste unbelievably delicious, these recipes are bound to satisfy everyone’s palates.

First up is Maple-Dijon Roasted Root Vegetables. I have made both Gwyneth Paltrow’s and Ina Garten’s versions of this dish before and have enjoyed both immensely. So I thought it would be fun to combine the two and get the best of both dishes. This is a very easy dish to prepare and can be prepped ahead of time so all you have to do is pop it in the oven before the guests arrive.


Ingredients
4 tablespoon maple syrup

4 tablespoon dijon mustard
1 pound carrots, peeled
1 pound parsnips or rutabaga, peeled
1 large sweet potato, peeled
1 small butternut squash, peeled and seeded (about 2 pounds)
3 tablespoons good olive oil
1 1/2 teaspoons kosher salt
1/2 teaspoon freshly ground black pepper
2 tablespoons chopped flat-leaf parsley

Directions
Preheat the oven to 425 degrees F.
Cut the carrots, parsnips, sweet potato, and butternut squash in 1 to 1 1/4-inch cubes. All the vegetables will shrink while baking, so don't cut them too small.
Place all the cut vegetables in a single layer on 2 baking sheets. Mix together maple syrup, mustard, olive oil, salt and pepper then drizzle the vegetables with the mix. Toss well. Bake for 25 to 35 minutes, until all the vegetables are tender, turning once with a metal spatula.
Sprinkle with parsley, season to taste, and serve hot.
Serves 8.


Next up is the Butternut Squash Soup. I have made this soup numerous times before and it is one of my favorites to make on Sunday for weekday lunches. It is also quick and easy to make and the best part is that it tastes creamy without any cream or dairy required. This recipe is taken straight out of Daniel Green’s Healthy Eating for Lower Cholesterol
. Don’t let the slightly medical title deter you - all of the recipes in this cookbook are ridiculously yummy and yet so simple. It is one of my favorite cookbooks.

I doubled this recipe for Thanksgiving and there was enough for at least 15 starter soups.

Ingredients

1 medium butternut squash
1 tablespoon olive oil
1 onion, diced
1 small potato, quartered
2 garlic cloves
850 ml or 4 cups of vegetable stock
Salt and pepper
Handful of chives

Directions

Peel the squash, scoop out the seeds and cut into thick wedges. Heat the oil in a large pan or soup pot. Add the onion and cook on low heat for 1-2 minutes. Add the butternut squash and potato and coat in oil. Cook for two minutes on medium heat then add garlic and season.

Add the stock and simmer for 25 minutes. Using a hand blender or food processor, blend thoroughly.

Serve with some sprinkled chopped chives.

Ina Garten's Italian Wedding Soup

/ Tuesday, November 15, 2011 /

I love this soup. I had to say that straight out of the gate because it really is a fantastic fall soup. It has so much texture to it, from the colors and flavors to the variation between meatballs, pasta and vegetables. And it really has a “stick to your bones” quality that fills you up on a cold fall day too. Plus this makes a ridiculous amount of soup so it is great for leftovers or a party.

Ina Garten’s version is fairly straight forward to make. For the vegetarian option, I use one tube of LightLife’s Gimme Lean Sausage to replace the meat portions of the meat balls and I find it works wonderfully.

Ingredients
For the meatballs:
• 3/4 pound ground chicken
• 1/2 pound chicken sausage, casings removed
• 2/3 cup fresh white bread crumbs
• 2 teaspoons minced garlic (2 cloves)
• 3 tablespoons chopped fresh parsley leaves
• 1/4 cup freshly grated Pecorino Romano
• 1/4 cup freshly grated Parmesan, plus extra for serving
• 3 tablespoons milk
• 1 extra-large egg, lightly beaten
• Kosher salt and freshly ground black pepper

For the soup:
• 2 tablespoons good olive oil
• 1 cup minced yellow onion
• 1 cup diced carrots (3 carrots), cut into 1/4 inch pieces
• 3/4 cup diced celery (2 stalks), cut into 1/4 inch pieces
• 10 cups homemade chicken stock
• 1/2 cup dry white wine
• 1 cup small pasta such as tubetini or stars
• 1/4 cup minced fresh dill
• 12 ounces baby spinach, washed and trimmed

Directions
Preheat the oven to 350 degrees F.
For the meatballs, place the ground chicken, sausage, bread crumbs, garlic, parsley, Pecorino, Parmesan, milk, egg, 1 teaspoon salt, and 1/2 teaspoon pepper in a bowl and combine gently with a fork. With a teaspoon, drop 1 to 1 1/4-inch meatballs onto a sheet pan lined with parchment paper. (You should have about 40 meatballs. They don't have to be perfectly round.) Bake for 30 minutes, until cooked through and lightly browned. Set aside.

In the meantime, for the soup, heat the olive oil over medium-low heat in a large heavy-bottomed soup pot. Add the onion, carrots, and celery and saute until softened, 5 to 6 minutes, stirring occasionally. Add the chicken stock and wine and bring to a boil. Add the pasta to the simmering broth and cook for 6 to 8 minutes, until the pasta is tender. Add the fresh dill and then the meatballs to the soup and simmer for 1 minute. Taste for salt and pepper. Stir in the fresh spinach and cook for 1 minute, until the spinach is just wilted. Ladle into soup bowls and sprinkle each serving with extra grated Parmesan.

Makes about 8 servings.

Ranch Club Panini

/ /

Sometimes when I need some inspiration on what to cook next, instead of turning to a cookbook, I start rummaging through the kitchen to see what gadgets or appliances haven’t been used recently, then find something to make with it. Given the amount of kitchen appliances and the lack of storage space, things tend to get lost in the back recesses of the cupboards, but last week, the Panini press got to see the light of day.

I decided to check out Williams-Sonoma for panini recipes (I know, I know, I sound like a broken record about the place but I really love it!) and was intrigued by the Ranch Club Panini. It was a bit of a twist on just a plain Chicken Club sandwich, plus it had avocado and it had cheese (which is the new chocolate for Aric and I – see his post on the Mac and Cheese). It sounded like a great Friday night dinner.

I used Gardein chick’n for myself (they have wonderful meatless options for us vegetarians) and a thin cut of chicken breast for Aric. If you can’t get your hands on the Williams-Sonoma buttermilk ranch rub, buy a packet of the dry buttermilk ranch dressing at the grocery store and mix in some dried chives, dill, cayenne pepper, garlic salt, and pepper then cover the chicken with that.

Serve with garlic steak fries and enjoy while it’s still warm!


Ingredients:
8 slices country Italian bread, each 1/4 inch thick
Olive oil for brushing
1/4 cup mayonnaise
8 bacon slices, cooked until crisp
2 boneless, skinless chicken breasts, each about 8 oz.
8 tsp. buttermilk ranch rub*
1 avocado, peeled, pitted and cut into slices 1/4 inch thick
8 slices provolone cheese, about 6 1/2 oz. total

Directions:
Preheat a panini press to 400°F according to the manufacturer’s instructions.

Brush one side of each bread slice with olive oil. Turn the slices over and spread with the mayonnaise. Top 4 of the slices with the bacon, dividing evenly.

Butterfly the chicken breasts, cut each one in half and pound to 1/4-inch thickness. Rub each piece with 2 tsp. grilling rub or place rub and chicken in a plastic bag and shake until covered. Place the chicken on the panini press, close the lid and cook, turning once, for 4 minutes. Place 1 chicken piece on each of the bacon-topped bread slices and top with the avocado and cheese, dividing evenly. Cover each sandwich with one of the remaining bread slices, oiled side up.

Place the sandwiches on the panini press, close the lid and cook until the bread is golden and crisp and the cheese is melted, 4 to 5 minutes. Serve immediately. Serves 4.

Bobby Flay's Macaroni & Cheese Carbonara

/ Monday, November 14, 2011 /
Lactose Intolerants beware. High cholesterol junkies, avert your gaze. Dieters, direct your attention elsewhere. This next post is only for those of us whose blood flows freely through their arteries.

Dawn and I have been on a cheese rampage as of late. It all started with Dawn’s Salt adventure. We gorged ourselves on cheese till we were blue in the face. You would think after stuffing ourselves full of 3 different cheeses to the point where it hurt to breathe we would avoid the cause. But, it’s actually had exactly the opposite effect. We’ve found ourselves desiring more and more cheese over the past few weeks. This past Sunday I wanted to make dinner, and I wanted to use a recipe from Bobby Flay’s Throwdown cookbook. His Thowdown with Delilah Winder over Macaroni & Cheese hit the spot.


Ingredients
• 1 tablespoon olive oil
• 1-inch thick piece pancetta, cut into small dice (I used stripples)
• 3 cloves garlic, finely chopped
• 3 tablespoons all-purpose flour
• 6 to 7 cups whole milk, heated
• 4 large egg yolks, lightly whisked
• 2 teaspoons finely chopped fresh thyme leaves
• 1 teaspoon cayenne pepper
• 2 cups freshly grated Asiago cheese, plus more for the top
• 1 1/2 cups Irish white Cheddar, plus more for the top
• 1 1/2 cups Mountain Valley Cheddar, plus more for the top
• 1 cup grated Fontina cheese, plus more for the top
• 1/2 cup freshly grated Parmigiano Reggiano, plus more for the top
• Salt and freshly ground black pepper
• 1 pound elbow macaroni, cooked just under al dente
• 1/2 cup coarsely chopped flat-leaf parsley

Directions
Preheat oven to 350 degrees F. Butter the bottom and sides of a 3 quart baking dish and set aside.

Heat the oil in a large saute pan over medium heat. Add the pancetta and cook until golden brown on all sides. Remove with a slotted spoon to a plate lined with paper towels.

Add the garlic to the pan and cook until lightly golden brown. Whisk in the flour and cook for 1 to 2 minutes. Whisk in 6 cups of the hot milk, increase the heat to high and cook, whisking constantly until thickened, 3 to 5 minutes. Whisk in the eggs until incorporated and let cook for 1 to 2 minutes. Remove from the heat and whisk in the thyme, cayenne, and all of the cheese until completely melted, season with salt and pepper. If the mixture appears too thick, add some of the remaining milk 1/4 cup at a time.

Place the cooked macaroni in a large bowl, add the cheese sauce, reserved pancetta and parsley and stir until combined. Transfer the mixture to the prepared pan. Combine together additional Asiago, Cheddars, Fontina, and Parmesan in a bowl and sprinkle evenly over the top of the macaroni. Bake in the oven until heated through and the top is lightly golden brown, 12 to 15 minutes. Remove from the oven and let rest 10 minutes before serving.


Follow-Up
Let me assure you of this, this is without a doubt the best macaroni & cheese I’ve ever had (sorry mom, but Bobby’s got you beat on this one). It’s rich and heavy. Your taste buds will scream for seconds, but your stomach will holler for you to put your fork down! Don’t plan to do any athletic activities after dinner, just find a good movie or football game and curl up on the couch while your stomach goes to work. The majority of us will end up in a food coma, but make no mistake, it will be the best food coma you have all year.


This blog posted whilst lying on the floor in a food coma ;)

Bruschetta

/ /
There are so many wonderful things you can do with a tomato. It’s an incredibly versatile ingredient. One of my favorite tomato-based recipes is Bruschetta. It’s a very common appetizer made in all kinds of restaurants. Everyone makes their dish a little different, uses different ingredients, different herbs. I enjoy trying everyone’s different interpretation and seeing how it varies from mine.


I remember the first time I made Bruschetta. It was when I was first beginning to discover the joy of cooking. Through most of high school my dad and I had a lot in common. Sports, cars, politics; I was growing into a man, and had a lot going on that closely related to my father. My mother and I didn’t have the same level of similar interests. I had never been interested in cooking, but we both saw it as an opportunity to spend some time together. As I recall, I was home from college and wanted to help out with dinner. Somehow I volunteered to make Bruschetta. I had no idea what I was doing and asked questions throughout the entire ordeal. But I will say this, add enough fresh basil and garlic to pretty much anything and you’ve got a winning recipe. I’ve made Bruschetta many times since that first try and I believe I’ve developed a pretty good version. Here is my rendition of this popular appetizer.

- Tomatoes: get the best looking, freshest tomatoes you can find. If you have a garden, there is no doubt that homegrown is the best. For this attempt I used a couple of different colors to change things up.
- Fresh Garlic
- Basil
- Onions
- Kalamata Olives
- Feta Cheese
- Olive Oil
- Balsamic Vinegar
- Salt & Pepper

These are the base ingredients. Like always I don’t have specific measurements, just keep adding whatever you think is missing or whatever taste you want more distinct.


You will need a French Baguette as well. Slice the Baguette in pretty thin slices, between ¼ and ½ inch thick. I like to put some cheese on the bread and stick it under the broiler for a few minutes until the cheese is browned and the bread is toasted. I have found Mozzarella to work well for this. Once you pull the bread and cheese out from the broiler spoon as much of the Bruschetta on top of each piece as possible. Just know that it will spill, that’s part of the joy. Serve while still warm.

This blog posted whilst listening to Mambo Italiano.

Love This Season!

/ /

There are many things that I love about the changing of the seasons this time of year. I love to see the leaves change color. I am more than happy to see the sweltering days of August fade away to the crisp, frosty days of November. I love football season. I train and prepare all summer so I’ll be ready for Thanksgiving dinner. And Christmas is undoubtedly my favorite holiday, even though I fervently loathe the rampant proliferation of Christmas emblazonry and promotions months before the actual holiday arrives. But there is one thing that I may love even more than anything else, Eggnog. The first time I see Eggnog in the grocery store I experience absolute and unfettered joy that can only be described as an amalgamation of the joy of Christmas morning for my nieces and nephews, and the cinematic depiction of Masquerade on the 2005 version of the Phantom of the Opera. Needless to say, I am very excited to announce that I had my first glass last night.

If you like eggnog, check out our eggnogg waffle post here.


PS: This is not what my glass looked like.

Holiday Ideas for the Home and Kitchen

/ Sunday, November 13, 2011 /
Everywhere you look, Christmas is in the air. At the department stores, decorations are up. On the radio, the Christmas music station is in full swing. And online, the holiday gift guides are popping up everywhere. And I am a sucker for these gift guides, especially when they are at some of my favorite stores. So I thought I would share two of the websites I am following thus far.


The first website to catch my eye this season is Terrain. If you hang out with me long enough, you will learn that I have an undying love for the brand Anthropologie. Not only do I drool over the ever-changing clothes, displays, and catalogs, but I have always been a fan of their home goods section. Which is why Terrain, the lifestyles branch of the head company, makes for a welcome addition to my holiday shopping. Terrain carries a plethora of the same home goods you would find in Anthropoligie as well as garden-related items.


Currently, Terrain is only available in two locations: their website and the Pennsylvania shop. The store is called Terrain at Styer's, set in an antique greenhouse on an 11-acre site in Concordville, PA, just outside of Philadelphia. Styer's is a century-old nursery, which also offers a full range of residential landscape services. Terrain hosts in-store events and classes on things like Living Gifts for the Holidays and Holiday Tablescapes. There is even a café serving decadent menu items like Roasted Swordfish, french lentils, roasted cauliflower, thyme butter.

For holiday shopping ideas, gifts ideas range from food items like the Maple Syrup sampler to indoor gardens like the Drop Glass Tillandsia Kit.


But the Mediterranean Trio has to be my favorite thing on this website. Three matching pots hold a miniture rosemary plant, olive tree, and lavender plant - perfect for filling a house with the scents of the outdoors all year round.


As Aric and I have mentioned before, Williams-Sonoma is one of my go websites for everything from recipes to new cookware. So it would only make sense that I would make it my go-to website for holiday shopping for the foodies in my life. I think it is always fun to pick up for others the kitchen tools or accessories that aren’t essentials but are so much fun to have around. The Breville Panini Press, the Ebelskiver filled-pancake pan, and the Imperia Pasta machine are all favorites and were all gifts that I was more than happy to not only receive over the years but also give to those I love.


This year, I think my new favorite has to be the Zoku Quick Pop Maker.

Not only can you create your own customized frozen pops, they have recipe books and a character tool kit to help you make the most of this family-friendly gadget.

Happy shopping!

Bellbrook Secret

/ Wednesday, November 9, 2011 /
As I explained in yesterday’s post, Dawn and I have been interested in sharing our thoughts on local restaurants that we enjoy. I’d like to share about another local gem we’ve discovered. There is a great little brunch place in Bellbrook called the Blueberry Café. I used to visit this place quite regularly. I’ll be honest, I haven’t been in quite some time, but this post isn’t about the café, it’s about a restaurant that opened shortly before the last time I visited Blueberry Café. I’d never made it back down to try the new place out, but I’d heard a few good things, so about a month ago Dawn and I headed down to try things out. As we looked over the lunch menu, we were both very impressed. The lunch menu is incredibly well priced and quite diverse. Out of curiosity, we asked to look over the dinner menu, which was even more appetizing. We haven’t been back to try dinner yet, but we wanted to share some pictures of the lunch items we ate and tell you just how impressed we were, and invite anyone local to give Amelia’s Bistro a try.

I ordered their “Different Kind of Caesar”


And their “Fish Tacos”


Dawn ordered the ½ sandwich and salad, and got a vegetarian BLT and their “Almond Crusted Goat Cheese Salad”

We also ordered a Brie and fruit appetizer.

Taste Testing: A Salt Experience at Home

/ Tuesday, November 8, 2011 /
Our inspiration for this blog: Salt Tasting Room - Vancouver, Canada

A couple of years ago, when I living in Vancouver, Canada, I was introduced to a fun restaurant called the Salt Tasting Room. This establishment’s whole concept centers around combinations of artisan cheese, cured meats, and drinks. The idea is simple in that guests assemble a tasting plate from the daily selections (the menu items change constantly) and you can either make your own pairings or rely on the expert opinion of your server.

Salt is located in the heart of Gastown’s historic Blood Alley, and yes, the front door to the place is actually off of an alley. Inside is a restoration gem, full of original brick, wooden beams and columns, and concrete floors. The back wall is completely covered with a chalkboard, outlining the daily selections to choose from and guests sit either at tables or benches lining the walls.

I went in skeptical, wondering how essentially tapas (in my mind) would make a meal but I was pleasantly surprised. I guess it adheres more European concept to eating in that you eat each pairing in stages so you have time to linger over your food and enjoy it. After a few pairings, I was actually full. Even more so, I had tasted different foods that I might not have otherwise thought of trying before, and thus, I was hooked on the concept

I had mentioned this restaurant to Aric in passing a couple of weeks ago and decided that it would make for a fun date night. So I ventured to the local grocery store and collected the assortment of goodies.

When it came time to actually arranging the tasting selections, Aric and I were both secretly worried that it wouldn’t be enough food. Let me me warn you now though that looks are deceiving when it comes to this meal!! By the end of the second of the third pairings, we were both stuffed but wanted to try the third one so badly, we stuffed it in. I think the key for us next time is taking each round a bit slower and spacing it out more, like what you get at Salt.

Whichever way you decide to do this fun culinary taste test, have fun with your pairings and try new products or pairings you wouldn’t think would normally go together. You might be pleasantly surprised!

Menu One: Camembert, Apricot Compote with Cashews, Blueberries


Menu Two: Bosc Pears, Honey Roasted Turkey Breast (for Aric), Drunken Goat Cheese


Menu Three: Bleu d’Auvergne cheese, Italian Roast Beef with walnuts (for Aric), Honey (for me), Gala apples

Dining Out

/ /
For quite some time Dawn and I have wanted desperately to share our thoughts on things outside of what we happened to have cooked on any given day. One of the many ideas we’ve discussed addressing is sharing our thoughts on various restaurants and eateries we’ve visited. We finally have an opportunity to do just that. A few weeks ago we stopped into a local cooking store to look around. As we were perusing through the knives and cutlery, a young man meandered up to us and asked if we would be interested in testing some food. It had been several hours since we had eaten lunch so we gladly accepted his offer. He then asked us to have a seat and said he’d be out shortly with the food. So Dawn and I waited. I think we both expected the guy to hand us a couple of to-go cups and that would be that, but that was not the case. Our wait lasted long enough that Dawn and I began to wonder if we were going to have to pay for the food we had agreed to. Shortly thereafter the gentlemen returned with a platter full of food. He brought stuffed chicken, mushroom risotto, French onion soup and pumpkin soup. We slowly began working our way through the platter and with every bite became more and more impressed with the quality and flavor of the food, and neither of us like mushrooms. As we finished off the last of the food, the gentleman came back out to chat. He told us that the store was very active, with activities ranging from education, to radio shows, to their deli, and that they were even working towards offering dinners on the weekends. Our conversation was much too short to provide a full explanation of all the activities offered, so in turn I will refer you to their website, www.culinarycompanyonline.com. I encourage anyone in the greater Dayton, OH area who hasn’t stopped in to do so, and for those who are familiar with the Culinary Company maybe it’s a good time to stop back in and see what new adventures they may have lined up for you to partake in.


This blog posted whilst listening to Pandora Radio's Smooth Jazz.